08. Arterial Line Placement
Radial > femoral (patient cannot ambulate, increased risk for infection) > axillary > brachial (lack of collaterals).
- Arterial line kit (includes 4x4 sterile gauze, sterile mask and hair net, Tegaderm).
- 20G angiocatheter with guidewire (NOT currently included in most UCSF kits).
- 1% lidocaine without epi, 5-10ml syringe, 22-25G needle.
- Arm board, tape to secure arm, biopatch (Moffit) or “toilet bowl” (ZSFG).
- Sterile gloves, eye protection.
Radial Artery Cannulation
- Obtain informed consent and complete time-out with RN.
- Request that RN sets up and calibrates the transduction system.
Anatomy/finding the radial artery:
- With the arm supinated, palpate the radial pulse 1-2 cm from the wrist.
- Place the ultrasound probe immediately proximal to the wrist, on the lateral aspect, centered over the radial pulse.
- Radial artery will be a larger vessel running between two adjacent veins (noncompressible, pulsatile, Doppler flow away from heart).
- Perform Allen’s test to evaluate the patency of the radial-ulnar arteries:
- With hand supine, have the patient make a fist for 30 seconds (if awake) then occlude both radial and ulnar arteries simultaneously until hand blanches.
- Release pressure from ulnar artery and monitor for reperfusion and “blushing” of the hand.
- If color does not return within 5-10 seconds, release radial pressure→ this is a positive test and this arm should be avoided.
- Alternatively, use ultrasound with Doppler to evaluate for intact flow in the ulnar and radial arteries.
- If both sides are intact, use ultrasound to follow the radial artery starting at the wrist and moving proximal. Select the side that is more superficial with less tortuosity for ease of procedure.
- Place the patient’s hand on a wrist board or rolled towel with wrist dorsiflexed to bring the radial artery into a more superficial position.
- Consider securing the dorsiflexed positioning via papertape wrapped around the hand and connected to the bed.
- Operator should be on the ipsilateral side, oriented parallel to the trajectory of the patient's arm.
- Ultrasound should be located on the ipsilateral side towards the head of the bed.
- Bed level should be raised for proceduralist comfort.
- Clean and drape the area in sterile fashion and use sterile gloves.
- Palpate the radial artery 1-2cm from the wrist, between the distal radius and flexor carpi radialis tendon.
- Two options: (1) angiocatheter over a needle or (2) Arrow catheter kit with an integrated wire for a modified Seldinger technique. The approach is identical.
- Arrow kit (recommended for beginners):
- Palpate the artery with your non-dominant hand proximal to the insertion site.
- At a 30-45˚ angle, insert the needle slowly until a flash of blood is seen in the catheter hub.
- Once a flash is seen, advance 2-3mm more to ensure the tip is fully in the vessel lumen and then drop the angle of the catheter to avoid perforating through the vessel.
- Advance the wire in the system, which should thread easily.
- Gently slide the catheter over the wire into the vessel and remove the wire.
- Occlude the artery proximal to the catheter and connect the transduction system.
- Angiocatheter (same as above until a flash is seen):
- Follow steps a-c above.
- Advance the catheter over the needle into the vessel.
- Occlude the artery proximal to the catheter and remove the needle.
- Connect the transduction system.
- Ultrasound assistance (recommended unless experienced operator):
- Prepare the area in sterile fashion, as above.
- Use the ultrasound to locate the radial artery and slide the ultrasound proximally along the artery to visualize its trajectory.
- Move the radial artery to the center of the ultrasound screen about 1-2cm from the wrist.
- Hold the ultrasound in your nondominant hand, and use your dominant hand to insert the needle from the angiocatheter or Arrow kit in the direction of the artery trajectory at a 30-45° angle to the skin.
- Once through the skin, find the tip of the needle with the ultrasound.
- Slowly move the ultrasound proximally so that the tip is out of view, followed by slowly advancing the tip of the needle into view. Repeat this step until the needle tip is seen entering the artery. NOTE: keep the needle at a 30-45° angle to the skin, but redirect trajectory towards the radial artery.
- When the needle tip is seen entering the lumen of the radial artery and there is flashback, hold the delivery system still by bracing the dominant hand and drop the ultrasound probe.
- Complete either step 17 OR 18 depending on the catheter type.
- Secure the catheter either with a biopatch (Moffitt) or the “toilet bowl” (ZSFG) and Tegaderm.
- Reassess perfusion of the hand after placement. Remove the catheter immediately if there is any sign of vascular compromise.
- Arterial spasm is common. If you lose the ability to palpate the pulse, the likelihood of successful cannulation is slim. Either select another site or wait until the spasm has ceased.
- If you cannulate the artery but fail to place the line, hold pressure for several minutes. A large hematoma can obscure your anatomy making subsequent attempts much more difficult.
- If you are having difficulty threading the wire or catheter, despite return of pulsatile blood, either your angle is too steep, the needle tip is not completely in the artery, or you have perforated through the artery. Try decreasing the angle or advancing the catheter slightly.
Femoral Artery Cannulation
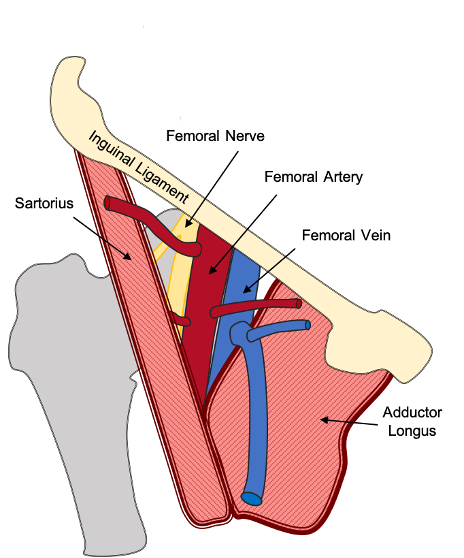
- Supine with ipsilateral leg straight, abducted, & externally rotated opens femoral triangle.
- Operator on ipsilateral side.
Locating the access point:
- Landmarks: start 2-3cm below the inguinal ligament and 3-4cm lateral to the pubic tubercle. Remember in the femoral triangle lateral to medial are the Nerve→ Artery → Vein (NAVEL).
- Use ultrasound to differentiate the femoral artery from the vein. Femoral artery is superior and lateral to the femoral vein (noncompressible, pulsatile, Doppler flow away from heart).
- Access should be distal to the inguinal ligament, but proximal of the bifurcation into the superficial and deep femoral arteries.
- Ensure entry site is 2-3cm BELOW the inguinal ligament. Increased risk of retroperitoneal bleed and peritoneal injury above this point.
- Direct needle tip directly cranial at 30° angle to the skin.
- Use the same technique described above in 19a-h.
Shiloh AL, Eisen LA. Ultrasound-guided arterial catheterization: a narrative review. Intensive Care Med 2010;36(2):214-21.
